There’s this little place near our apartment that does garlic butter chicken that’s borderline addictive. Tiny pieces of chicken, golden crust, swimming in this garlicky butter sauce with herbs. Christina and I went there on a random Friday night last fall, and I spent the entire meal trying to figure out what was in it. Wrote notes on a napkin like some kind of food detective.
I went home and started messing around in the kitchen that same weekend. First attempt was decent but the chicken came out a little dry. Second try, I cut the pieces smaller and cooked them faster. Third time, I nailed the garlic butter ratio and our daughter literally licked her plate. Not exaggerating. Christina looked at me and said, “We don’t need to go back to that restaurant anymore.”
So here it is. The version that finally got the stamp of approval from the toughest food critics in my house. The whole thing takes about 20 minutes from cutting board to plate, and the ingredients are stuff you probably already have. Simple, fast, and the kind of dinner that smells so good your neighbors might knock on the door.
Why This Version Works
Most garlic butter chicken recipes dump everything into the pan at once and hope for the best. That’s how you get soggy chicken with burned garlic. This version separates the steps on purpose. You sear the chicken first with just a little butter and oil, building that golden crust without any garlic in the way. Then the garlic, extra butter, and herbs go in at the end when the heat is lower. That way the garlic blooms for about 90 seconds instead of turning bitter, and the butter stays silky instead of browning into something acrid.
The flour coating is the other piece that makes this work. It’s not a thick batter or anything heavy. Just a thin dusting with dried herbs mixed in. It gives the outside a slight crispness that holds onto the butter sauce, so every bite is coated. If you’ve made cheesy chicken and rice casserole before, you know how good seasoned chicken can be when the coating is right. Same idea here, just on the stovetop.
Ingredients with Notes
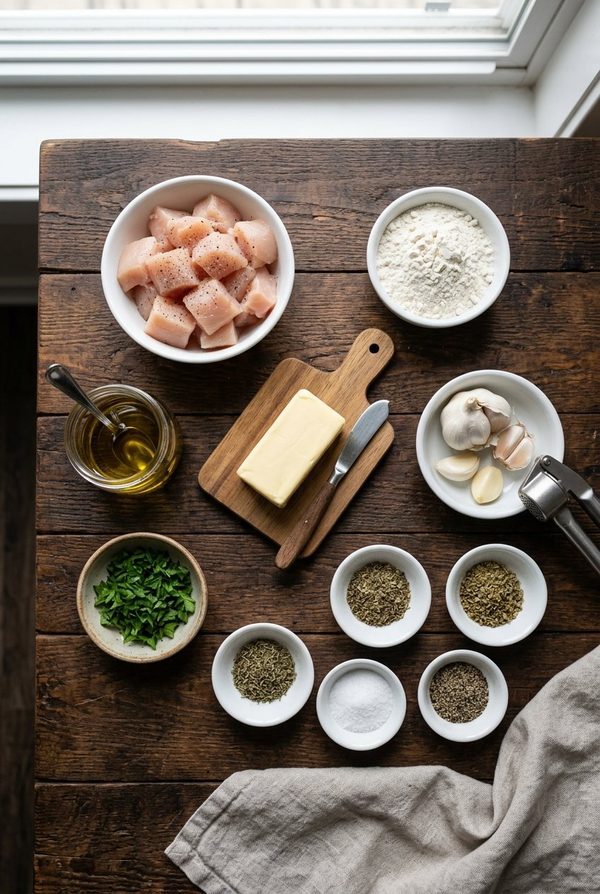
| Ingredient | Amount | Notes |
|---|---|---|
| Boneless, skinless chicken breasts | 2 to 3 medium | Cut into bite-sized pieces, about 1-inch cubes |
| All-purpose flour | 1/4 cup | Almond flour works for low-carb; cornstarch for gluten-free |
| Salt | 3/4 teaspoon | Adjust to taste |
| Black pepper | 1/3 teaspoon | Freshly cracked is better but pre-ground works fine |
| Dried basil | 1/2 teaspoon | Or sub Italian seasoning for all three herbs |
| Dried oregano | 1/2 teaspoon | See above |
| Dried thyme | 1/2 teaspoon | See above |
| Olive oil | 2 tablespoons | Regular refined, not extra-virgin |
| Unsalted butter | 3 tablespoons, divided | 1 tbsp for searing, 2 tbsp for the sauce |
| Fresh garlic | 3 cloves, minced | Don’t use the jarred stuff here, fresh matters |
| Fresh parsley | 2 tablespoons, chopped | Flat-leaf has more flavor than curly |
A couple of these deserve a quick mention. The olive oil needs to be regular refined, not extra-virgin, because you’re cooking at medium-high heat and EVOO will smoke before the chicken is done. And the butter is divided on purpose. One tablespoon goes in with the oil for searing. The remaining two tablespoons go in at the end with the garlic. Don’t dump it all in at the start or the milk solids will burn before the chicken is cooked through.
Step-by-Step
1. Cut and dry the chicken.
Start by cutting your chicken breasts into bite-sized pieces, roughly 1-inch cubes. You don’t need to be precise here, but try to keep them roughly the same size so they cook evenly. Once they’re cut, pat them dry with paper towels. Both sides, every piece. I know it’s tedious with small pieces, but dry chicken sears properly while wet chicken steams and turns rubbery. Toss the paper towels, grab a bowl, and move on.
2. Mix the seasoned flour.

In a medium bowl, combine your flour, salt, pepper, basil, oregano, and thyme. Stir it around with a fork until everything is evenly distributed. You’ll be able to see the herbs speckled through the white flour when it’s ready. Drop your chicken pieces in and toss them around until every piece has a thin, even coating. Use your hands if you need to, tongs if you’re feeling civilized. Shake off any excess flour. You want a light coating, not a thick shell.
3. Get the pan screaming hot.
Place a 12-inch skillet on the stove over medium-high heat. Let it sit there for a solid 2 minutes before you add anything. A properly preheated pan is the difference between a golden sear and a sad, pale piece of chicken. After 2 minutes, add 1 tablespoon of olive oil and 1 tablespoon of butter. Swirl the pan as the butter melts and foams. When the foaming calms down and you see the butter turning a light gold color, you’re ready.
4. Sear the chicken in batches.
Here’s where most people mess up. They throw all the chicken in at once and the pan temperature crashes. Work in two batches if you need to. Lay the pieces in a single layer with a little breathing room between each one. Then leave them alone. Seriously. Don’t touch them for 3 to 4 minutes. You’ll know it’s time to flip when the edges turn opaque and the bottom is golden brown. If you try to flip too early and the chicken sticks, it’s not ready yet. Flip each piece, cook another 2 to 3 minutes on the other side, and transfer to a plate. If you’re doing a second batch, add the remaining tablespoon of oil and repeat (trust me, the second batch needs fresh oil or it’ll stick).
5. Build the garlic butter sauce.
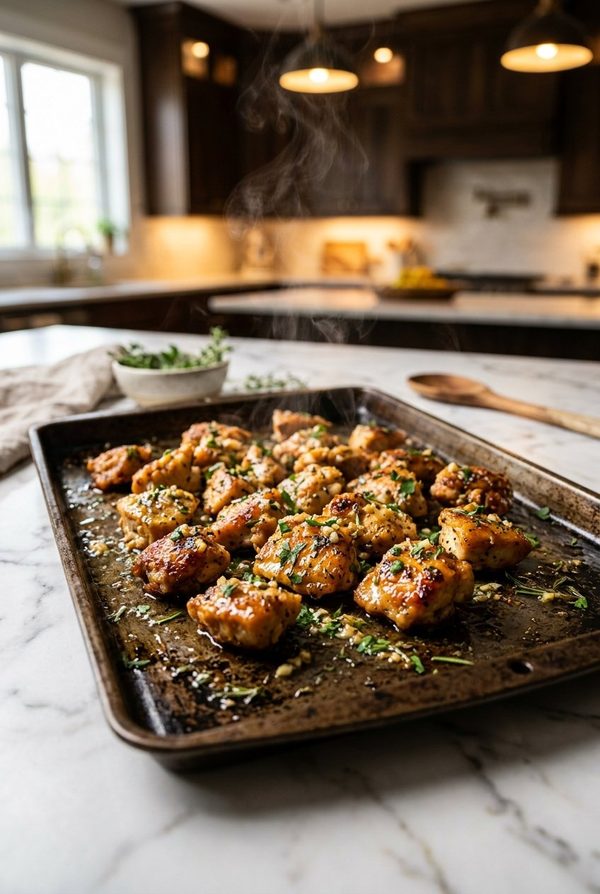
Once all the chicken is seared and resting on a plate, reduce the heat to medium-low. Drop in the remaining 2 tablespoons of butter. As it melts, scatter the minced garlic around the pan. This is the crucial moment. Cook the garlic for about 90 seconds, stirring constantly. You want it fragrant and barely golden, not brown. The second it starts to darken, you’ve gone too far and it’ll taste bitter. Add the chopped parsley and stir everything together. The butter should look like a thin, herb-flecked sauce with little bits of garlic throughout.
6. Toss and coat.
Return all the chicken to the pan and toss the pieces through the garlic butter sauce. Use a spoon to baste the tops of the chicken, scooping up butter from the edges and spooning it over. Do this for about a minute. Every piece should have a glossy, garlicky coating. Kill the heat and let the chicken rest in the pan for about 2 minutes before serving. Those 2 minutes let the juices settle back into the meat instead of running out all over the plate.
What to Serve It With
These bites are honestly great on their own, straight out of the pan, standing at the counter. But if you want a proper dinner, they go perfectly over white rice or mashed potatoes where the garlic butter pools up and soaks in. A simple green salad with lemon vinaigrette cuts through the richness nicely. Roasted broccoli or steamed green beans work too if you want something easy on the side. If you’re looking for another chicken dinner to add to the rotation, our chicken spaghetti casserole is a good one for nights when you want the oven to do the work instead.
Storage and Leftovers
Leftover chicken bites keep in an airtight container in the fridge for up to 3 days. Reheat them in a skillet over low heat with a small pat of butter to bring the sauce back to life. The microwave works in a pinch but the coating loses its crispness. I wouldn’t freeze these since the texture changes too much after thawing.
Recipe Card
Garlic Butter Chicken Bites
Crispy, golden chicken pieces tossed in a garlicky herb butter sauce. Ready in about 20 minutes with everyday ingredients.
- Prep Time: 10 minutes
- Cook Time: 12-15 minutes
- Total Time: 20-25 minutes
- Servings: 3-4
- Course: Main Course
- Cuisine: American
Ingredients:
- 2 to 3 medium boneless, skinless chicken breasts, cut into 1-inch pieces
- 1/4 cup all-purpose flour
- 3/4 teaspoon salt
- 1/3 teaspoon black pepper
- 1/2 teaspoon dried basil
- 1/2 teaspoon dried oregano
- 1/2 teaspoon dried thyme
- 2 tablespoons olive oil (regular refined)
- 3 tablespoons unsalted butter (divided)
- 3 cloves fresh garlic, minced
- 2 tablespoons fresh parsley, chopped
Instructions:
- Cut chicken breasts into bite-sized pieces. Pat dry with paper towels.
- Mix flour, salt, pepper, basil, oregano, and thyme in a bowl. Coat chicken pieces evenly. Shake off excess.
- Heat a 12-inch skillet over medium-high for 2 minutes. Add 1 tablespoon oil and 1 tablespoon butter.
- Sear chicken in batches, 3-4 minutes per side, until golden brown. Transfer to a plate.
- Reduce heat to medium-low. Add remaining 2 tablespoons butter and minced garlic. Cook 90 seconds, stirring constantly.
- Add parsley, return chicken to pan, and toss to coat. Baste with butter sauce for 1 minute.
- Rest 2 minutes in the pan before serving.
Nutrition per Serving (approximate):
| Calories | 290 |
|---|---|
| Protein | 30g |
| Carbohydrates | 8g |
| Fat | 15g |
| Fiber | 1g |
| Sodium | 430mg |
FAQ
Can I use chicken thighs instead of breasts?
Absolutely. Boneless, skinless thighs actually stay juicier since they have a bit more fat. Cut them into similar-sized pieces and cook them the same way. Thighs are more forgiving if you accidentally overcook by a minute or two, which is nice when you’ve got kids pulling at your leg while you’re standing at the stove.
How do I keep the chicken from drying out?
Two things matter most here. First, don’t skip patting the chicken dry before coating it. Sounds backwards, but dry surfaces sear better and lock in more moisture. Second, don’t overcook. Pull the chicken when it’s golden on both sides and the inside reads 165 degrees F. It’ll keep cooking a little while it rests. Overcooked chicken is the one thing garlic butter can’t fix.
What can I use instead of flour?
Cornstarch gives you a lighter, crispier coating and it’s gluten-free. Use the same amount. Almond flour works for low-carb but browns faster, so watch your heat. I’ve tried both and cornstarch is my pick if wheat flour isn’t an option.
Can I make this ahead of time?
You can prep everything ahead. Cut the chicken, mix the flour coating, and mince the garlic. Keep them separate in the fridge. When you’re ready, the actual cooking takes about 12 minutes. I wouldn’t cook the chicken ahead and reheat it because that golden crust just isn’t the same the second time around.
Back to That Friday Night
Funny thing is, we went back to that restaurant a couple months later. Ordered the garlic butter chicken again. Christina took one bite, looked at me, and said mine was better. Might have been the best compliment I’ve ever gotten in the kitchen. If you try this one and your family fights over the last piece, you’ll know you nailed it. And if you’re looking for more easy chicken dinners, the honey soy chicken drumsticks are worth trying next. Different flavor, same weeknight energy.